My church-friend, Trish, is a fellow mother of young children and lives a busy life on the go. I didn't even realize she was crafty until I took my girls to Sunday School when she was teaching one Sunday, and she had spread a beautiful quilt on the floor for their bible story time. We got to talking afterward, and low and behold, she's a fellow quilter!
Trish recently brought me three quilts to finish for her. She had pieced them a long time ago and had hoped to quilt them herself, but she had just kept pushing them off when life was demanding more of her attention. I was super happy to help her bring these quilts forward, so they can be ENJOYED!
Here's the first of her three quilts. I'll post the other two in subsequent posts. The pattern for this one was called "Swoon", which is exactly what I want to do! Such gorgeous patterns and colors. Big, bold 16-point stars. I loved quilting edge-to-edge peonies to add some yummy texture.
All my quilting is free-motion, hand-guided on a longarm quilting machine.
Wednesday, August 31, 2016
Tuesday, August 30, 2016
Jane's Ohio Star
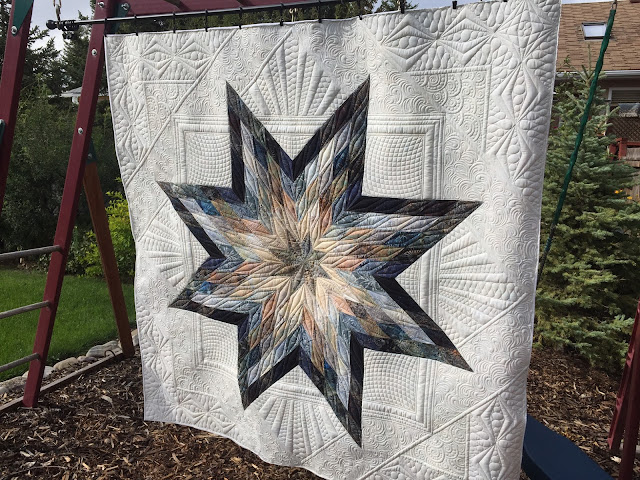
I love working on 8-point stars. Many people call them Ohio Star or LeMoyne Star, or even Texas Star. How ever you acknowledge them, they sure make a striking shape. Of course, being a buckeye girl, I love calling them OHIO stars!
This quilt, from my friend Jane, takes this very traditional quilting element and gives it a bit of a modern edge. Traditional quilts might have been more likely to have several stars replicated in a grid. This quilt has a single star that's a huge focal point - and it consists of dozens of diamond shapes. Lots of complex angles and points to fuss with when piecing. I'm sure glad it wasn't me!
Jane gave me full license to play with all the "negative space" surrounding the star. We tossed around some ideas and worked out a loose plan, and then I got to go wherever the quilt led me.
Uncharacteristic for me, I did a fair bit of marking before I even loaded the quilt on my frame. I drew all the squares/parallel lines and triangles with water-soluble markers. I wanted to make sure everything was even and straight from the get-go. The blessing and curse about quilting on (basically) solid-colored fabrics is that you see EVERYTHING. If you don't plan very intentionally, any mistakes or sloppiness will very likely draw attention. But if done well, it can be a really lovely effect.
All my quilting is free-motion, hand-guided on an APQS longarm quilting machine.
Thursday, August 25, 2016
Re-quilted Comforter
My youngest, Cordelia, recently transitioned from a crib to a "big girl bed". I acquired a hand-me-down bedding set and spent several days sanding and staining second-hand furniture, and voila! Cord is a big girl!
The comforter that came with the bedding set was really cute, but the el-cheapo batting inside had not been quilted very much (just a few ties interspersed around the comforter), and it had traveled and bunched up and didn't lay flat.
So I wacked off the edges, seam ripped the few little ties of quilting, and re-quilted it myself. Just some large scale meandering, but I think it will serve Miss Cord very well!
Tuesday, August 23, 2016
Sylvia's Irises
My dear quilty friend, Sylvia, brought me this paper-pieced wall hanging. Well, I think it might be more descriptive to say, she hurled it at me in disgust (not really). Ha! You see, Sylvia originally pieced this quilt many years ago, when Foundation Paper Piecing was a few generations back.
Paper Piecing is a method that involves a paper diagram, and you actually sew fabric TO the paper. And then you layer on another piece of fabric, in a very specific order (dictated by the pattern instructions), and sew THAT to the paper, and on and on. When you're done, you rip the paper off, and voila! It is really cool for creating perfectly accurate piecing - a requirement for really intricate patterns. Unlike regular piecing, there is no stretching or distorting. It's perfect. But somewhat time-consuming.
And in Sylvia's case, it was even MORE time-consuming, because the pattern was purchased a long time ago, before we knew as many tricks and tips for Foundation Paper Piecing, and it required her to iron the fabric to heat-bond paper. She didn't really know what to do with it at the time, so she just stowed it away and decided to deal with it another day.
Flash forward several years, and Sylvia wants to get this project done! So she had to wash and scrub and rip and tear and finesse all the little bits of paper to get them off. What a pain! Personally, I'm sure glad she took the time to do it, though, because I got to collaborate with her on this striking piece!
I used two layers of batting (QD Select on bottom, Hobbs PolyDown on top) to make the un-quilted areas really pop. I used McTavishing in the blue background, at a dense scale, and I pretty much stayed off the irises. I just stitched in the ditch of the stems and leaves. Some diamonds with continuous curves and serpentine in the borders, to contrast with the free-flowing filler of the background blue.
All my quilting is free-motion, hand-guided on a longarm quilting machine.
Monday, August 22, 2016
Russian Tiles #4
Russian Tiles is the gift that keeps on givin'! I was first hired to quilt the class sample for Rumpled Quilt Skins. This was such an honor, because I was a new longarmer at the time, and to have a well-respected designer and shop owner trust her quilt to me felt really great!
Then one of Rumpled Quilt Skins' students hired me to finish her quilt, and then another!
Each client has requested similar treatment to the original one (which I think must be a good sign that they LIKED it), but also allowed me to incorporate subtle changes that allowed me to make them each unique. It's been fun to see how each lady made the pattern her own, too, with various colors and piecing layouts.
This one had fun colors, and Mona encouraged me to use a thread color that contrasted just a bit, so it would really show up.
All my quilting is free-motion, hand-guided on a longarm quilting machine.
Subscribe to:
Comments (Atom)


