Saturday, February 27, 2016

Carol Anne's Owl quilt

This is a textbook example of an experience I get to have because of my job that I would never have otherwise had. If I were only quilting for myself, for instance - I'm always drawn to earth tones and traditional quilt patterns. So when something like this cheerful, funky, youthful, appliqued quilt top come my way, it's a breath of fresh air! It's adorable and absolutely lovely!

Carol Anne made this quilt top as a birthday gift for her soon-to-be 13-year-old granddaughter. I hope she loves it!

All quilting is free-motion, hand-guided on an APQS longarm quilting machine.


I put some dot-to-dot quilting in the larger, blank squares. 


The background space throughout much of the quilt is my "peony" filler. 


I also used Paisleys for a background filler. And I stayed out of the appliqued owl circles, so they would puff up and draw attention.


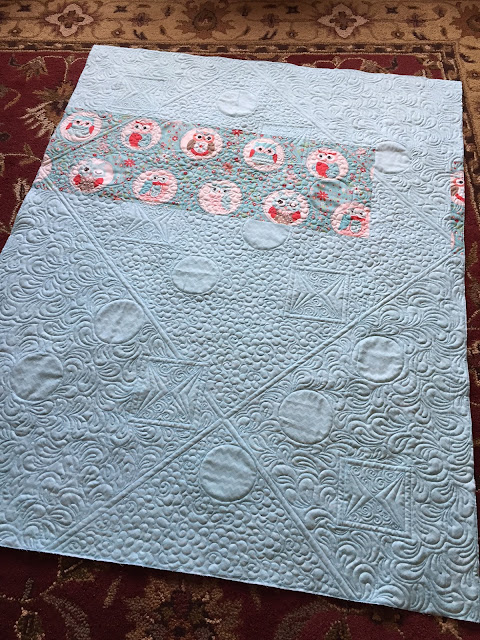
This is the back side.


Friday, February 26, 2016

New York Beauty quilt

This dazzler came from a client who actually purchased the quilt top at an inventory reduction sale in Eureka, Montana. Apparently, the original piecer (Cotton Pickin' Quilts) was moving from a traditional "stick" home into a full-time RV lifestyle, so she was drastically downsizing her stash of fabrics, including her UFOs (Un-Finished Objects). Luckily, this lovely piece made it into the hands of someone who will truly appreciate it - my client, Bev. I'm glad she brought it to me to have it quilted. She told me simply to have fun with it. I did!


I used Ribbon Candy in the golden areas around the perimeter of the focal center of the quilt, and also in the gold backgrounds around the stars. Look at all that paper piecing!


Swirls in the background blocks around the star bursts.


Back side.


Wednesday, February 24, 2016

Boot Scootin' quilt

One of my clients made this quilt for her teenage granddaughter, who will be graduating from high school this spring and going off to university in Lethbridge, Alberta. This barrel-racing girl will be sure to love her grandma's grad gift!


I outlined the appliquéd boots and did a starburst radiating out from them. In the patchwork blocks I did a paisley filler. Curved cross-hatch in the setting triangles. Beadboard in the wide borders. Rope motif in the narrow inner border.


I wanted to include the following photos, because I often hear from people who say things like, "I'm not a well-skilled quilter," or, "I don't make fancy quilts," or, "I'm not an award-winner. My quilts aren't perfect." This quilt had a small glitch, and guess what... so does every quilt I've ever seen! 

The most common issue I work with is wavy borders, and I've gotten pretty decent at getting them to lay flat (or at least APPEAR to lay flat). I also often see seams that are pulling apart, which I can easily secure by tacking down with quilting stitches. 

In this example, there was a seam that had a little flaw - the fabric from the block got snagged into the seam allowance for a few inches, and it was making the surround areas pucker. I ripped out those stitches and fixed the seam, and I don't think any on-lookers will ever be the wiser. 


Here's the view on the backside. You can see the little flaw in the seam, where the block's fabric got stitched into the seam allowance.


Here's the result after I picked out the seam and fixed it. After I pressed it and quilted it, it completely blended into the rest of the piece.


So, PLEASE - give yourself a break! Don't feel like your quilts have to be perfect. This is a human art form. It is not SUPPOSED to be perfect. It is supposed to be crafted with care and love. Construct your quilts with those, and that's all you need. And maybe also a longarm quilter who is handy at working with those perfect imperfections. Wink, wink!


Thursday, February 18, 2016

Peggy's Scrap Buster quilt

New client, Peggy, made this quilt for her grandson and lovingly incorporated his old clothes in it. It was so fun to quilt through the surface area and run across prints and textures and imagine him growing up in these clothes. And it also brought up some fun memories for me - I distinctly remember some of these prints in westernwear of the '90s. My high school years and the golden era of really attractive clothing.


I remember one of my best guy friends wearing this exact shirt (in the center) all through our sophomore year. 


This is the BACK. My uncouth cad of a hunter-husband liked it better than the top. Sigh.... Untrainable. 


Tuesday, February 16, 2016

Emily's Ribbon Quilt

For years, I've had people ask me if I make ribbon quilts. And I've always just said that's not really what I do. But this time, I couldn't say no. This time it was my own family - my cousin Emily in Illinois. And I think maybe I'd gotten tempered to the idea by un-assuming Pinterest posts. At any rate, I'm so glad I agreed to try this, because I ended up really enjoying it!

Emily sent me all the ribbons and rosettes that she'd saved up during her career in 4-H and FFA - most were livestock show ribbons, but there were also ones for public speaking, dairy cattle judging, volleyball, and so many more! I gave Emily a hard time, because the more colors there were, the more interesting the quilt would be. But most of hers were blue (that's a good problem!).

Interesting sidebar: did you know that in Canada (where I now live), first place ribbons are often RED and second place are BLUE? I was so honored to see a red ribbon on one of my quilts in the Calgary Stampede last summer, and didn't even notice it was for FIRST place until someone else told me. It's just the opposite of what I grew up with, showing livestock in the USA. I'm told it's the British influence.

This piece ended up being approximately 40" x 50", and it incorporated 185 ribbons. It is NOT a cuddle quilt. It is well suited as a wall hanging or perhaps a table runner. But it will not make a good lap throw or bed quilt. The stiffness of the ribbons makes it almost cardboard-like. Plus, because these ribbons represent priceless memories, I wouldn't want to try and use it anywhere that it would get prone to lots of handling (oils from your skin) or grime. If it got dirty, you might be able to spot treat, but there's no way you'll be able to through the whole thing in the washer.


I started by sorting the pile into "kinds" of ribbons. Her county fair had the most volume, for sure. Then there were the national-level shows. FFA competitions. State fair and other county fairs. And a few odd-balls, too. I wanted to try and show a cross-section of her show career.


I affixed the ribbons with a temporary bonding agent, then moved over to my domestic sewing machine to stitch them on. I was NOT able to use my long arm quilting machine for this project, but I welcomed a change of pace. I started at the center and worked my way outward, bonding then sewing four ribbons at a time. 


I zigzag stitched over every edge with mono-filament (clear) thread, so all you really see is ribbons, ribbons, ribbons!


There's not a single solitary raw edge in the whole quilt. I designed the layout specifically so that every cut edge would be covered by a factory-sealed edge of another ribbon. It kinda ended up like a basket weave layout.


Even if they were buried under other ribbons, I was so worried about the cut edges fraying out. I did several experiments with various techniques (including Fray Check - my mom's old favorite for EVERYTHING). The one that came out on top for me was to cut with a pinking (zigzag) blade, and then melt with a lighter. 


A lot of the junior national ribbons had the show's location (which changes from year to year), and I thought that was super cool. It was like a mini-geography quiz! 


The predominant color of the quilt was blue, so I used solid blue cotton fabric for the binding. I tried blue satin, because I thought the satin's sheen would really play well with the shiny ribbons, but the satin was way to loosey-goosey to work with. I cut one strip and tried ironing it in half, and gave up immediately!


Backside of the binding.


Back side. You can kinda see the "based weave" layout.


Even after using 185 ribbons, there was still a MOUNTAIN of ribbons leftover. Many of which were actually rosettes in purple/pink/white. Emily okayed me to make another smaller piece with just those colors, because I wanted to see how it would turn out. And even after THAT, there were still TONS of ribbons left!


For this smaller piece, I experimented with using ribbons as the binding fabric. I'll admit, I'm nervous about it, longterm. I'm concerned about the junctions, where I pieced two ribbons together and then pressed them open. I really hope they don't fray out. Those ribbons are just so doggone STIFF!


Back side of the ribbon binding.


Hoping my girls earn ribbons of their own some day!