Pages

Monday, May 30, 2016

Seams and Leaders in Backing Fabric

I often get questions about how to prepare backing fabric, like....
• Which way should the seam in my backing fabric go?
• What if my backing fabric is just shy of required size?

These questions often go together. Here are some thoughts...

• In order to mount your backing fabric onto a longarm frame, the overall width and length must be at least 8" wider/longer than the quilt top.

• If your backing is not quite big enough, you can attach "leaders" to it, in order to reach the required size from top to bottom. The sides aren't as crucial. Leader fabric can be any cotton fabric. It does not need to match the backing or the quilt. It will be trimmed off prior to binding. It should not be stretchy fabric. Please be generous with your leader measurements. The quilter needs minimum 8" longer than the quilt top, but 10" or 12" is even better.

• About seams on a longarmquilters try to have long seams run across the frame, from left to right. If we have it running up and down, from top to bottom, the seam will be rolled around the bars on the frame each time we advance the quilt to the next area. And each time that seam rolls around the bar, the thickness of the seam piles up on top of itself, making a bulky spot on the roller that can make it hard to stretch the quilt taut and can mess with thread tension.

Good To Know: It is preferable to a longarm quilter if your seaming and/or leaders allow for mounting width-wise on the frame (as in Example A below). This allows for more quilting in a single span of the frame, with less time spent tying off and advancing the rollers. If it's not possible to set up your seams and/or leaders to match Example A below, you can follow Example B, and it will still be fine. It's just not as handy for the quilter.

If attaching leaders: the actual, real backing fabric MUST be at least 4" (total) bigger than the quilt top. If there's not an extra 2" on each side, there's a chance you will have to trim down the quilt top after the quilting process is over.

If there is a seam in your backing: attach leaders parallel to the seam in your backing (if there is one). Being parallel to your seam is more important than being "hamburger-style". Very important: Leaders should run the same direction as the seam in the backing.

If there isn't a seam: attach the leaders to the longer edges of your backing, hamburger-style, if possible. See Example A below.

Keep in mind: the act of adding 1/4" seams to both ends will remove 1/2" from the overall length of the real backing.


If you're curious to see how this quilt turned out, click here to see my blog post about it.


Saturday, May 28, 2016

100th Quilt!

I've had my longarm quilting machine for about nine months now, and I've been having SUCH a ball with it. The other night, I needed a few minutes to wind down before I could settle down to sleep. So, just for kicks, I went back through this blog and counted all the quilts I had chronicled (plus two that have not been published because they are gifts yet to be given). 

And do you know how many quilts I counted? ONE HUNDRED AND FOUR! As much as I love her, that sure wouldn't have been possible on my trusty little Janome. 

I've had such a fun adventure so far, and I continue to learn new things every day. I feel like a cheesy success story. Do you remember those motivational speakers they used to bring in to talk to your entire high school, and they would tell you to find something you love and figure out a way to get paid for it? By golly, I did it!

I feel thankful for the talented, kind-hearted, good-natured ladies that are my clients and friends. Very pleased with the little niche I've carved out for myself. Proud of the body of work I have accumulated thus far.

And THIS is the 100th quilt that I quilted on my longarm. It is a baby quilt, and I sewed my love into every stitch.


I really love the effect a striped fabric can have in the binding. Especially when cut (or printed) on the bias (not seen here). 

Thursday, May 26, 2016

Jane's Puffy Circle quilt

This is another quilt from my longest-lasting customer, Jane. It is a gift for her granddaughter, and she wanted it to be cuddly - so, for me that meant I needed to keep the quilting less dense than normal. Jane also chose a really high-loft polyester batting that I stock, so it's really puffy, and with the minkey backing fabric she provided, it's really fluffy. I think granddaughter, Anik, is gonna love it!


Jane gave me assembled binding strips, and I stitched the binding on the front of the quilt before I removed it from the frame. A quick trim, and it went back to Jane, ready for her to hand stitch the binding onto the back.


Wednesday, May 25, 2016

The Sandy Tait Special

This is the second quilt I've done for my client Sandy. She was actually one of the very first strangers who paid me to quilt for her, when I got my longarm quilting machine last August.

Back then, she brought me a quilt that actually had a similar feel to this quilt - lots of squares, very modern and geometric. She looked at my quilting sample books and chose an interlocking squares motif for an all-over quilting pattern. What I didn't tell her at the time (but have since) was that I didn't actually LIKE that quilting motif. When I see very square and straight piecing, I usually recommend a softer, rounder quilting motif, to flow through and around all those straight seams. But I followed her wishes, and ended up eating crow, because the end result was wonderful!

So when she came to me earlier this month and had a new quilt in the same design sense, she requested the same treatment again. And again - I think it turned out great! So from now on, I'm calling this concept - squares on top of squares - the "Sandy Tait Special".

All quilting is free-motion, hand-guided on a longarm quilting machine.


Her back is as lovely as her top!

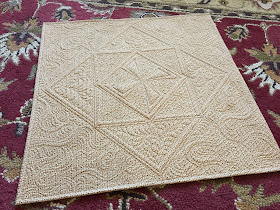
Wholecloth Table Topper

I recently visited some friends in Iowa, who generously hosted me when I was in-state for a quilt show, and I wanted to take them a gift from the heart... a quilt! I used some leftover pieces of fabric and two layers of batting to create this little table topper. I had a wonderful time on my trip. It felt really good to be back in Iowa. Thanks, Pat & Joane!

All quilting is free-motion, hand-guided on a longarm quilting machine.


Tuesday, May 24, 2016

Elenora's Log Cabins

This was a quick and simple all-over quilting assignment for my lovely client, Elenora. Much more easy-peasy than Elenora's last order, which was also a great project to be involved in.

I'm not sure what the actual name of this quilt block is, but I'm calling it a Log Cabin quilt. It's got a similar "start with a square in the middle and then build longer and longer strips around it" style to it. However, the strips are of varying widths, which make the "log cabins" off-center, and then there are also cornerstones - almost like 9-patch. So I'm not really sure WHAT to call this quilt, but I don't care! It's wonderful!

Fun and flirty "peony" pattern to soften up the hard edges and flow through all the straight lights. All quilting is free-motion, hand-guided on an APQS longarm quilting machine.


I'm sad that you see the fold creases so obviously on the back side. I finished this quilt late at night and just draped it over the back of the couch before going to bed. When I laid it out the next morning to take photos, I didn't realize the creases showed up so much. They didn't show up in real life. I didn't even notice them until looking at the photo just now. A little time laying out on a bed, or a shot of steam from an iron would realize the creases easily. 


Monday, May 23, 2016

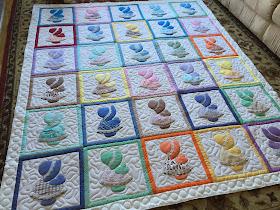
Sunbonnet Sue

This quilt came from my client, Julie, who appliqued and pieced this quilt top several years ago. It was almost ruined in the High River (AB) flood of 2013. She carefully laundered it and worked at getting the tough stains out. Some of the beads were discolored, but Sunbonnet Sue is a survivor!

Every time I get to quilt for Julie, she reminds me that she wants it soft and cuddly, and NOT over-quilted. She's adamant about it! So for Julie, I tried to tone it back from my norm and keep it simple and sparse.


Somewhere in the life of this quilt, it developed a little tear in the fabric. I loaded some matching thread and ran a million tiny stitches over the area. It's not too terribly noticeable, and it will hold those raw edges safe from unraveling.

The beadwork and lace were beautiful embellishments to the very traditional little Sue. Although, the beads were a little tricky to work around. Some of them obligingly nudged out of the way, as my machine's hopping foot came by. Others stayed firmly put, so I had to raise and lower my needle, stroke by stroke, creating one stitch at a time until I got away from the beads. 


Sunday, May 22, 2016

MQS 2016 - My first Quilt Show!

When I purchased my longarm quilting machine in the summer of 2015, I had been quilting for a few years on my domestic sewing machine. By that point, I had already fallen in love with the QUILTING part of the quilt-making process, and I knew I wanted to pursue that little sub-section of quilting more seriously (if you aren't sure what I mean about this sub-section, see my blog post: What Exactly Do you DO?). I knew that I wanted to expand my world of quilting possibilities and level of productivity, so Eric and I discussed and schemed and figured and saved, and I transitioned to a longarm quilting machine. And, BOY, have I loved it!

Part of my pursuit at being the best I can be is acquiring as much education and training as I can. I've taken several online classes, watched hours and hours of video on YouTube, and taken a few classes at quilt shops.

One of the big decisions that I (and Eric) made was for me to go to a national-level machine quilting show, a convention geared specifically toward people who do machine quilting like me. These shows feature an extensive lineup of teachers who are experienced in the field, classes and demonstrations for a huge variety of techniques, a product trade show with the latest gadgets and gizmos, and of course, a melting pot of quilters to visit and exchange secrets with.

There are a few machine quilting shows in the U.S., and based on scheduling and a few other factors, I decided to register for MQS (Machine Quilters' Showcase) in Cedar Rapids, Iowa. It was a big expense to get me there, hire childcare during my absence, pay for classes and incidentals, etc. I did not make this decision lightly, but I finally convinced Eric this was a valuable experience for me to have.

My goals for the experience were:
1) I wanted to take as many classes as I could. To learn new techniques that will add to my repertoire (and appeal to clients) and to learn ways to be faster at techniques I already know (and increase productivity).
2) I wanted to see some products in person, which I'd been considering purchasing online but was wondering about whether they were what they seemed.
3) I wanted to peruse the quilt entries and be inspired, and enter a quilt myself to receive feedback by expert judges.

I packed my MQS schedule chock full of classes and was running from sun-up to past-sundown. With two toddlers at home, it's hard for me to get away, so I crammed as much I could into my time. I took classes with Claudia Pfeil (Germany), Krista Withers (Washington), Karen Farnsworth (Missouri), Sue Heinz (Minnesota), and Sue Patton (Ontario).

Premotion Pforals with Claudia Pfeil: This was a hands-on class where I got to watch the teacher draw, then watch her stitch, then stitch myself on a longarm machine provided by a show sponsor. This is Claudia's in-class piece - she was just doodling and demonstrating.

Examples that Claudia brought with her. So inspiring!

In class with Krista Withers (Compositional Quilting - The Path). Krista does a LOT of marking before she ever starts quilting. Taking the time to do a lot of marking is not one of my strengths, and it's something I need to be more disciplined about.

Examples that Krista brought with her. Proof that marking and planning can create stunning results. 

Krista doodling and demonstrating.

My newest celebrity quilter crush! Krista has such a neat spirit and soothing way about her. Neat lady!

This was a hands-on quilting class, and I got to share a longarm quilting machine with my new friend, Kerry Fisbeck from Oklahoma. She was so much fun!

And speaking of my new friend, Kerry, below is a snapshot from my class with Karen Farnsworth, a lecture-style class about whole cloth quilting. And it just so happened that one of the quilts that Karen showed us in our class was an entry at this very quilt show - from Kerry! Her ribbon-winning whole cloth quilt was so forward-thinking and funky. I wish I'd taken a good photo of it. It was amazing! 

I can't believe I didn't get a photo of my lecture/drawing class with Sue Heinz. Called "Flight School", the class was focused on the fundamentals and anatomy of feathers - really detailed and nit-picky (in a good way). One of the coolest things was watching her draw. I can't describe it. In fact, I was stopped in my tracks at the trade show when I came across her booth. She had big screen TVs showing her drawing some of her signature patterns, and it was absolutely mesmerizing. I seriously just stood there and watched, mouth agape. Forget quilting, this chick can DRAW! I really wish I had taken her "Featherworks" class, which taught her embellishments and adornment with feathers. Next time!

ZenSuedling with Sue Patten - These are examples that Sue brought to show us. You guys - seriously - everything you see here is THREAD. The quilt was blank black fabric. NO KIDDING. We spent the whole time in this 4-hour class marking our own blank black pieces of fabric and came home ready to quilt them. Sue is such a little bundle of dynamite. What a trip!


One of the things I learned from my first Quilt Show experience was that I should have padded in more time for "nothing". I did not allow enough time to walk through the trade show and peruse all the new products and try everything out. One of the things I wanted to find was some sort of gadget to clamp the sides of my quilts, to pull more evenly than the two little clamps that came with my frame. I was particularly interested in Renee's Red Edges (below), but then I saw some wide clamps at Deloa Jones's booth that looked simpler and faster to use. 

But thanks to a recommendation from a classmate, I found my way to a booth for Fred's Creative Woodworking. This lovely old man is (presumably) the husband of a quilter. He actually brought a lathe with him from Pennsylvania and taught a class on woodturning for husbands who had come along with their quilting wives. He had the coolest and niftiest treasures for sale at his booth. Tools and gadgets that are totally innovative. Magnetic pin holders. Wooden bowls designs to hold a ball of yarn for knitters, so that the yarn doesn't roll all over the floor. A winder for quilt binding. Bobbin caddies. Just a ton of great stuff! Including these great side clamps. Long enough to span the whole edge of the quilt frame, they are easy to use, because they use very powerful magnets to clamp, along with a strip of emory paper. They were so popular that they sold out the first day, so I had to place my order to be mailed to me after he could get back home and make up some more!

And of course, I went to MQS seeking inspiration. Turns out, this was a double-edged sword. The amazing work on display was absolutely inspiring, but on the other hand, as I walked around looking at the RIDICULOUSLY amazing quilting, it was also depressing, in a way. To look at these pieces, and realize, "There's no way I'll EVER be at this level." Nor, actually, do I think I aspire to be, to tell you the truth. I mean, I get antsy to move on when I've spent 20 or 30 hours on a quilt. I started talking to ladies and learning that some of these quilts had HUNDREDS of hours in them - in the quilting alone. One lady said she spent 9 MONTHS on her quilt. I get frustrated after a week or two on  a single quilt. I just don't think I have it in me to make that kind of commitment to one piece. This was a new realization for me. A little disillusioning, but a valuable lesson to learn, as I figure out my identity as a longarm quilter.

But no matter what, you have to appreciate the beauty, the precision, the vision, the craft involved in the big award winners. These are FRIGGIN' AMAZING! I'm mad at myself that I didn't get better photos of the quilter info. These gals are so talented!
Best In Show - Bethanne Nemesh


First place in my category (updated custom). 

This one was SECOND place in my category. Honestly, how could I have ever thought I could compete?

Third Place in my category. Amazing!

I was very honored to bring home a ribbon myself. As I understand it, after the judges have gone through all the entries and awarded the overall awards and the category awards, then the teachers from the week are allowed to go through and award a "faculty ribbon" to a quilt that spoke to them. Thanks to Helen Baczynski for her recognition of my entry!